
Connecting your first receiver to the controller
Power On
Switch the power on by pressing in the power switch on the right-hand side until it clicks. (Power off is the same - press it in until it clicks, then release). The screen will light up white for about 1/2 to 1 second, then the splash screen will appear:
The firmware version number is displayed on this screen, more about that later.
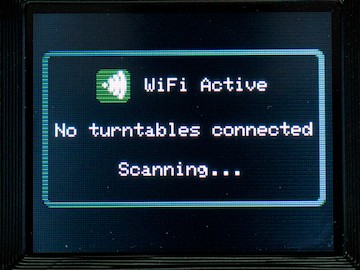
Scanning for receivers
After the splash screen has shown, the controller will switch to its "scanning" mode. This screen appears whenever no receivers are connected:
Depending on Wi-Fi conditions, the direction of the wind, and sometimes just the way you hold your face, it can take a minute or two for a receiver/receivers to connect. If, after 3-4 minutes, it still hasn't connected; please verify that the receiver is in fact powered up. Sometimes, power-cycling the receiver can be enough to spring it into action.
Note that the Wi-Fi system does NOT require any external Wi-Fi equipment (routers, modems etc.) - the controller and receivers form a self-contained "mesh" network.
Receiver connected
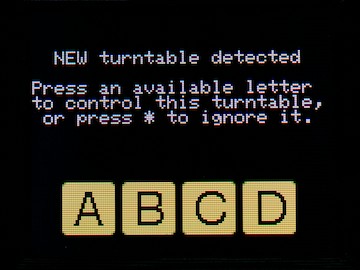
The first time a receiver connects to a controller, it will request a "slot" (letter designation). The controller will inform you of your options:
 |
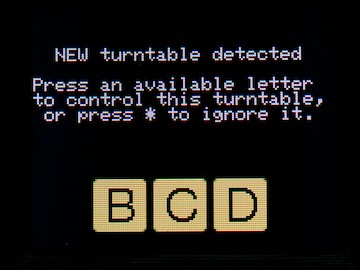 |
| FIrst turntable for this controller | Second turntable for this controller ("A" already assigned) |
Once you have chosen the letter (simply press it on the keypad), the display will change according to the state of the receiver.
If you press the star button (![]() ) to ignore the receiver, it will be ignored for as long as the controller remains powered on. If it is still there if the controller is switched off/on again, it will again present itself to be added.
) to ignore the receiver, it will be ignored for as long as the controller remains powered on. If it is still there if the controller is switched off/on again, it will again present itself to be added.
A typical situation where one would ignore a new receiver is, for example, at an exhibition - if someone else within WiFi range has a brand new unconfigured turntable, and your controller detects it before theirs does, you could in theory "snatch" it! Please don't, that would be rude!
Note that any unconfigured receiver will be detected by any active controller in range. However, once a receiver is paired to your controller, it will only be detected by that controller until you reset or release it.
Having paired the receiver to your controller, one of the following will happen, depending on the receiver:
State 1: Brand new receiver, never used
In this instance, the receiver will first need to self-calibrate to the turntable. The initial screen will be shown:
Pressing zero on the keypad will un-pair this receiver from the controller - which will immediately cause it to display the "ABCD" screen from above! Press ![]() to ignore it if that' what you wanted to do anyway...
to ignore it if that' what you wanted to do anyway...
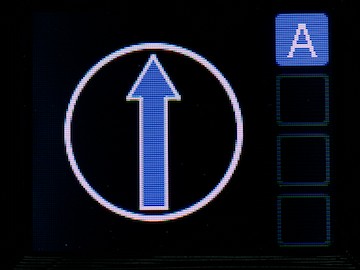
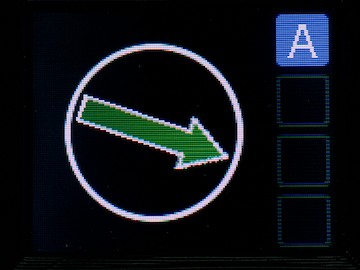
To begin the calibration process, press the "Clockwise" button on the controller. The display will change to show a vertical blue arrow. The turntable will begin to spin. After completing one or more full revolutions, the arrow will turn green, and begin to turn at the same speed as the turntable. It will complete one more full revolution, then stop facing upwards.
 |
 |
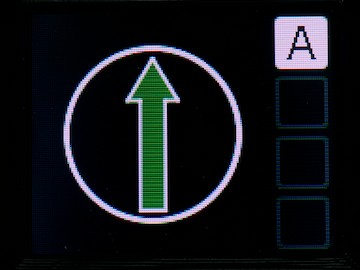 |
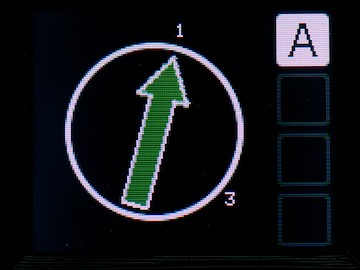
| Calibrating (turntable turning) | Homing (turntable calibrated) | Complete and ready to be programmed |
The initial calibration/homing speed will vary depending on the gearing between the stepper and the turntable: Direct drive will be alarmingly fast, 10:1 will be distressingly slow.
The turntable may turn in reverse first, then switch direction. This is part of the calibration process. It may also "twitch" and continue to revolve; this is because it got an unexpected reading from the home sensor. It will do this up to three times before giving up (and returning to the "Initialisation" screen). Normally, one calibration is enough; occasionally a second round is needed. If it won't calibrate after three attempts, please check your home sensor is securely mounted, correctly orientated and the power supply/sense pins are connected and correct. The Universal Drive Unit has a red LED on the sensor, this will either come on or go out (TO BE CLARIFIED!) when the sensor detects the home position. If you are using your own sensor, please verify it is working as expected with a multimeter. Also please note, some hall switches are pole-sensitive; e.g. it works fine with the north pole pointing at it, but the south pole is "fuzzy" and may give false readings.
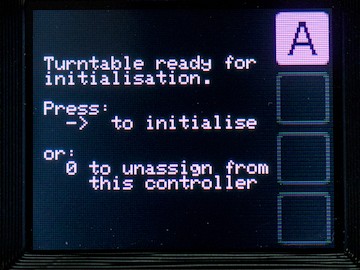
State 2: Receiver ready for initialisation
If a receiver is powered on having been powered off, it will no longer "remember" where it is, and will need initialising. The same screen as above is shown initially (the initialisation screen); but when the turntable starts rotating, it will immediately rotate on the screen (starting in the vertical position). As soon as the home sensor is detected, the arrow will jump back to vertical. If a default road has been configured, the turntable will then rotate to the default road and stop. At which point, the screen will display the road numbers in their respective positions.
State 3: Receiver ready
If the receiver has been powered continuously since the last operating session, then when it is detected by the controller, it will immediately display the road positions and direction arrow. It can be used straight away, there is no need to re-initialise it. The display will look similar to the one above.
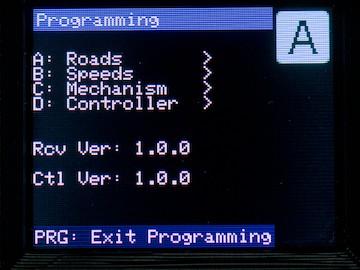
State 4: Programming mode
If the receiver was in programming mode when the controller was switched off, it will still be in programming mode when the controller re-connects. In this case, you will be presented with the programming menu. To clear this and return to the normal operating mode, simply press the PROG button.
Congratulations!
Assuming you are now looking at a screen similar to the above, it's now time to start programming your turntable!