
Setting turntable speed and acceleration
To access the speed configuration menu, from the main programming menu, press the B key.
The screen will show as follows:
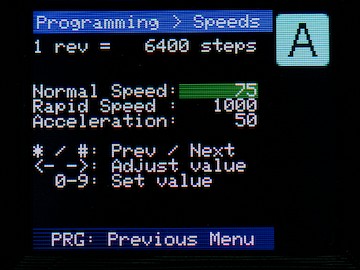
The first line tells you how many steps the motor takes per revolution of the turntable. A direct drive unit will have 6400 steps per rev; a 5:1 gear reduction (e.g. the Bexhill West Universal Drive Unit) will have 32,000 steps/rev.
There are three speeds to configure - the one you are changing now is highlighted in green (or yellow).
Normal Speed
This is the normal operating speed of the turntable, in steps per second. So, in the above example, the turntable is set to 75 steps/second, which means a full rotation will take a little under a minute and a half (6400 ÷ 75 = 85.33 seconds). In fact, it would take a little longer due to acceleration, which we will cover in a moment.
Rapid Speed
In certain circumstances, the turntable makes "rapid" (non-scale-realistic) movements. Examples include calibration, initialisation, when programming (modifying) roads, and if you have chosen to make a manual rapid movement.
In the above example, this is set to 1000 steps/second. In the above example again, this means a full rapid rotation will take 6.4 seconds (6400 ÷ 1000); as rapid movements don't accelerate/decelerate, this figure is pretty accurate. The number of seconds for a full rotation can be multiplied by the gear reduction; e.g. on a 5:1 drive reduction (32,000 steps/rev), the total time for a full revolution would be 32 seconds.
Acceleration
The acceleration rate describes how quickly the turntable will speed up and slow down as it starts and stops, in normal mode.
The value is in steps per second, per second. If this makes perfect sense to you, please feel free to skip to the next section... If it's left you scratching your head, read on!
To make the maths a bit simple, let's assume an acceleration value of 10 steps/sec/sec, and a target speed of 100 steps/sec:
- The turntable starts at speed zero (i.e. not moving).
- Over the course of the next second, it increases speed to 10 steps per second (it does this smoothly, not in jumps)
- ...after the next second, it's doing 20 steps/second.
- ...and so on, until after 10 seconds, it's moving at its full speed of 100 steps/sec.
- It continues at this speed until it's 10 seconds away from its destination. Then, it starts slowing down
- At 9 seconds to arrival, it's reduced to 90 steps/second, at 8 seconds 80 steps/sec, and so on...
- ...until it arrives, and stops.
If we doubled the acceleration to 20 steps/sec/sec, then it would take 5 seconds to reach full speed, and 5 seconds to slow down again. And so on.
Rather than calculate exact figures, the most sensible course of action is to adjust the values until it looks about right to you. Bear in mind that a real locomotive on a real turntable (especially a hand-turned one) might be significantly slower than you'd like on a model layout!
Changing the numbers
There are two ways to change the numbers:
- You can simply type new values over the top of the originals. As with other areas in the system, the number you are changing is highlighted with a yellow background as you type; when it turns green after about 1/2 second, it's "locked in" (you can immediately over-type it again, or adjust as below, if needed)
- Alternatively, you can use the ACW/CW buttons to bump the value down or up (respectively): The Normal and Acceleration values go up and down by 1s, the rapid speed goes up and down by 10s.
The number you are editing is highlighted in green. To go to the next number, press ![]() , to go to the previous one press
, to go to the previous one press ![]() .
.
The highlight "wraps around", so you can get to all the numbers by repeatedly pressing either key.
Once you are happy with the numbers on the screen - press the ![]() key to save. Then press the PROG key to return to the programming menu.
key to save. Then press the PROG key to return to the programming menu.
No Comments