
Adding, Modifying and Deleting Roads
To access the road programming menu, press the "A" button from the main programming menu. The screen will change to show the roads menu:
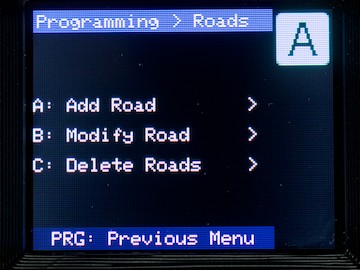
To exit the roads programming menu, press the PROG button, which will return you to the main programming menu.
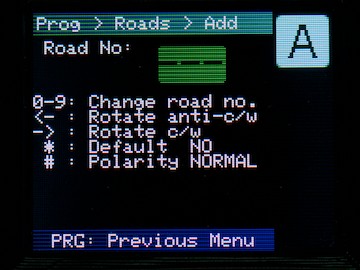
Adding a road
To add a new road to your turntable, press the "A" button. The "Add Road" screen will be displayed:
Modify an existing road
Since the Add and Modify screens are almost identical, we will cover both actions in one section. In fact, the mode will switch between Add and Modify as required, as described below.
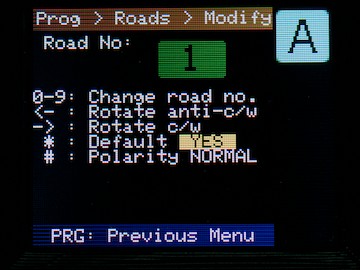
When you first enter the Modify menu, the turntable will potentially make a rapid move to the default road (e.g. if you've just powered up, and the controller doesn't know which road the turntable is at). Otherwise, it will choose the currently selected road & display that configuration.
Programming a road
Choosing the Road Number
You can program a road with any number you desire, between 1 and 100 inclusive. To enter the road number, simply type that number on the keypad. Whilst you are typing, the number will be displayed on a yellow background. Half a second after you finish typing, one of two things will happen:
- If the road number you typed does NOT exist already, the mode will switch to "Add" if it wasn't already.
- If the road number you typed DOES exist already, then:
- The mode will switch to "modify"
- The turntable will make a rapid rotation (in the shortest direction) to the current position of the road.
The background of the number will switch to green to indicate that is is now the "active" number (as per the "Modify" screenshot, above).
You can re-type the number(s) at any time - the mode will automatically switch between Add and Modify as required.
If you type an existing road number, the current settings for that road will overwrite anything you might have changed already.
Setting the road position
Setting the actual position of the road is done with the anti-clockwise (ACW) and clockwise (CW) buttons on the controller. When programming a position, you will always send the HEAD end of the table (indicated by the arrow head) to the desired position. You can go in either direction; simply press and hold the appropriate button.
The turntable will start to turn in your desired direction (the display will show the arrow moving). It will start very slowly, and begin to accelerate. The longer you hold the button down, the faster the turntable goes (until it reaches the programmed rapid velocity - see the next page for info on that). When the turntable reaches the position you desire; release the button, and it will immediately stop.
Now, unless you have superhuman reactions (or luck!) and have landed dead on alignment... you can use the ACW/CW buttons to "jog" the turntable into the correct position. The very slow initial movement should assist in this.
And that's all there is to setting the position!
Other configuration parameters
There are two more parameters you may wish to set:
Default Road
On initialisation, the turntable will turn to the default road, if it is configured. The first road you add to a controller will, by default, be the default(!) road - but you can change this at any time.
Simply press the ![]() key to toggle between Default = YES and NO for the road you are currently adding/modifying.
key to toggle between Default = YES and NO for the road you are currently adding/modifying.
If there is already another road defined as default, it will be replaced with the current road, if you set default = YES.
Polarity
You can tell the turntable to reverse the track polarity for any given road, should you need to, e.g. to prevent shorts on a DCC system.
To toggle the value between NORMAL and SWAP, press the ![]() key.
key.
Save the road information
To complete the process, press the ![]() button to save the changes. The controller will return to the Roads menu once saved.
button to save the changes. The controller will return to the Roads menu once saved.
You can now add/modify additional roads as required.
Delete a road
Should you need to delete an obsolete road from the turntable configuration, choose option "C" from the road menu.
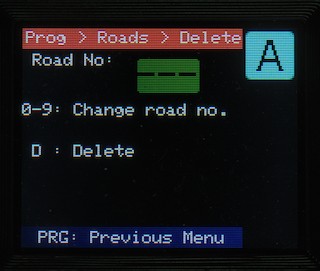
Select the road to delete by typing its number. As with the other screens, the number is highlighted with a yellow background until it "locks in", when it has a green background. If you type a road number that doesn't exist, the screen will display three dashes, as above.
Having typed the road to delete, press the ![]() key; the "D: Delete" message will change to read "Press D again to confirm deletion" - press
key; the "D: Delete" message will change to read "Press D again to confirm deletion" - press ![]() again to finally delete the road. Any other key will cancel.
again to finally delete the road. Any other key will cancel.
When the road is deleted, the screen will go back to the Roads menu.
No Comments